2. Installation
2.1. Install AlmaLinux 9
2.1.1. Boot the Install Image
Download the latest AlmaLinux 9 DVD ISO by navigating to the AlmaLinux mirrors list, selecting the latest 9.x version for your machine’s architecture, selecting a download mirror that’s close to you, and finally selecting the latest .iso file that has “dvd” in its name. Use the image to boot a virtual machine, or burn it to a DVD or USB drive and boot a physical server from that.
After starting the installation, select your language and keyboard layout at the welcome screen.
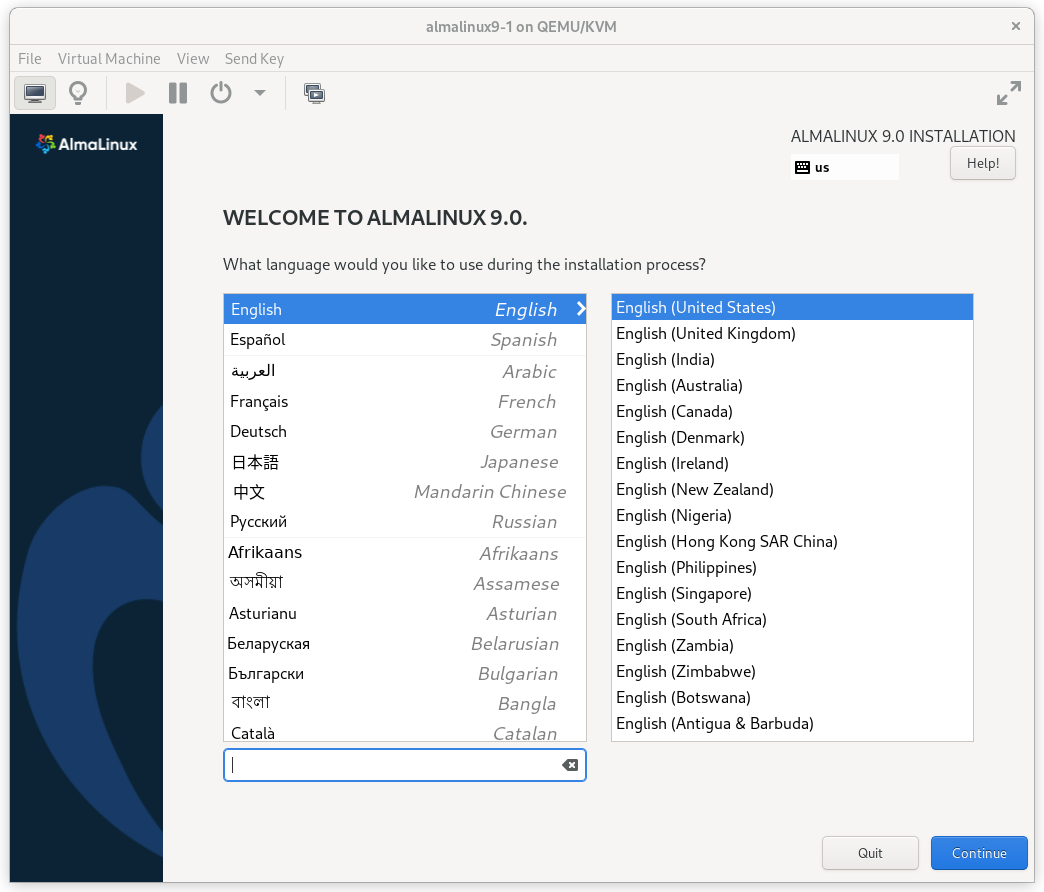
AlmaLinux 9 Installation Welcome Screen
2.1.2. Installation Options
At this point, you get a chance to tweak the default installation options.

AlmaLinux 9 Installation Summary Screen
Click on the SOFTWARE SELECTION section (try saying that 10 times quickly). The default environment, Server with GUI, does have add-ons with much of the software we need, but we will change the environment to a Minimal Install here, so that we can see exactly what software is required later, and press Done.
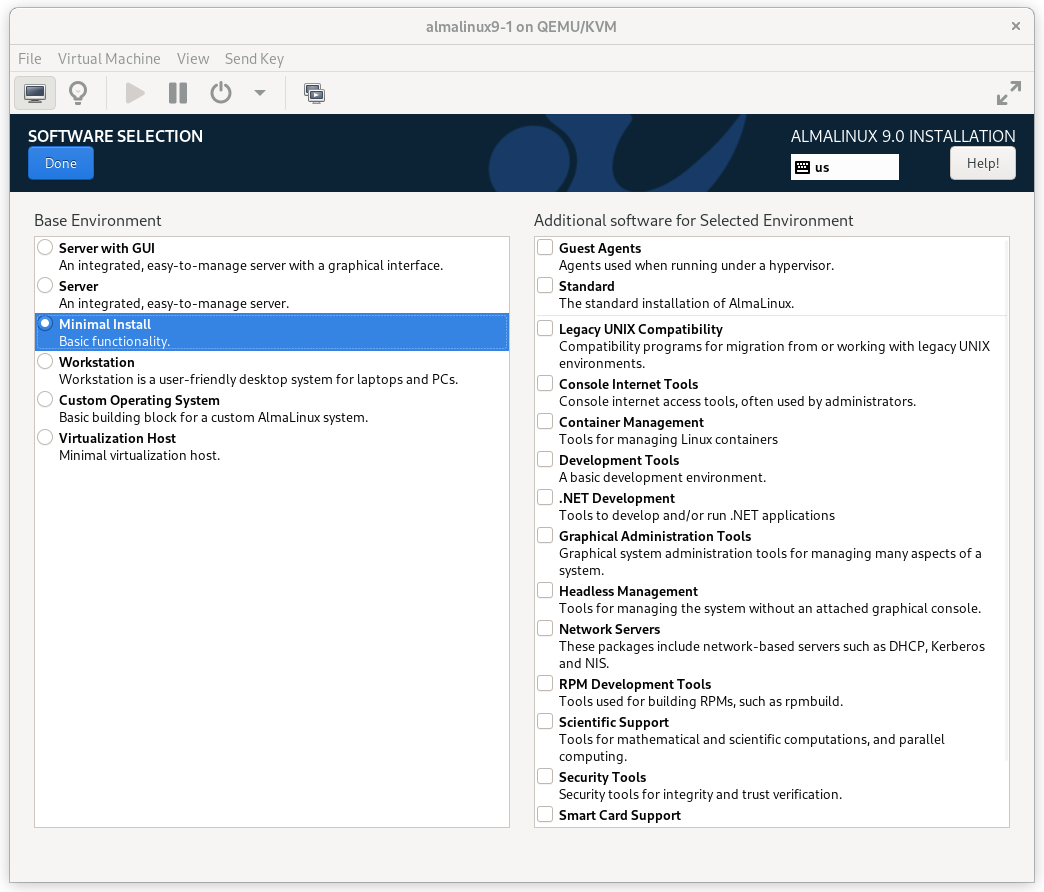
AlmaLinux 9 Software Selection Screen
2.1.3. Configure Network
In the NETWORK & HOST NAME section:
- Edit Host Name: as desired. For this example, we will enter
pcmk-1.localdomainand then press Apply. - Select your network device, press Configure…, select the IPv4
Settings tab, and select Manual from the Method dropdown menu. Then
assign the machine a fixed IP address with an appropriate netmask, gateway,
and DNS server. For this example, we’ll use
192.168.122.101for the address,24for the netmask, and192.168.122.1for the gateway and DNS server. - Press Save.
- Flip the switch to turn your network device on (if it is not on already), and press Done.
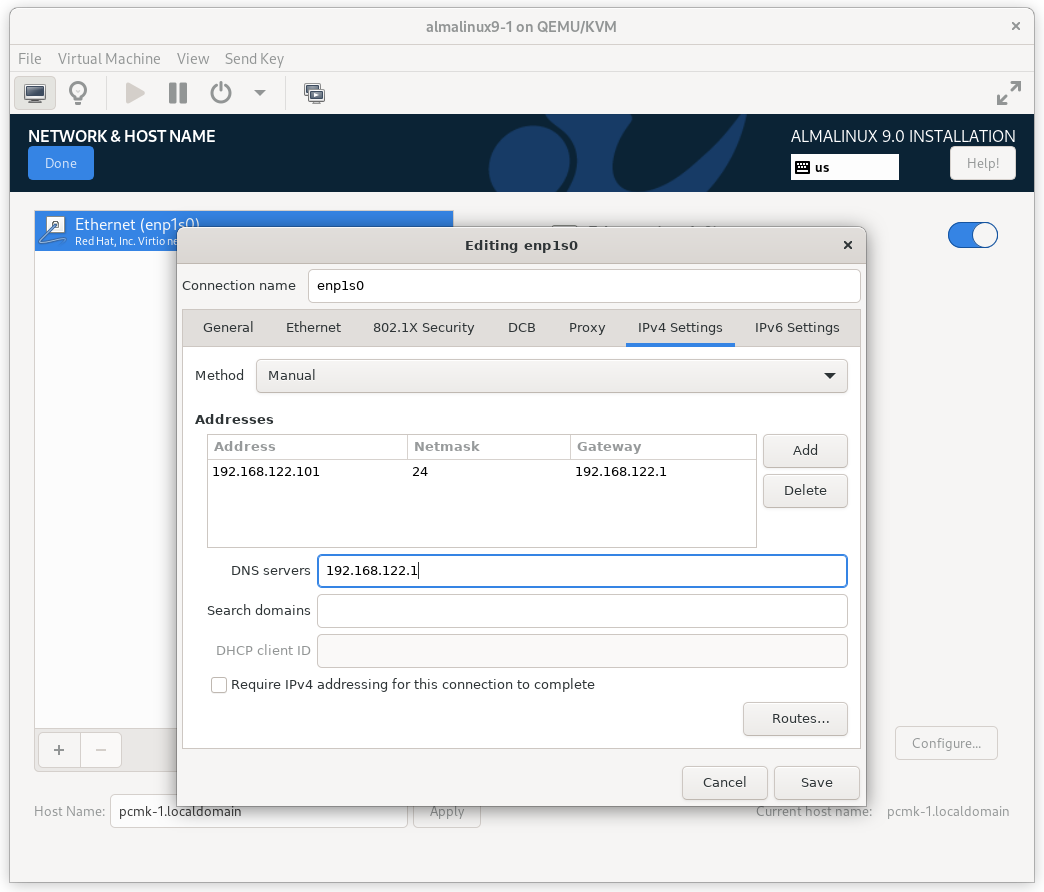
AlmaLinux 9 Network Interface Screen
Important
Do not accept the default network settings. Cluster machines should never obtain an IP address via DHCP, because DHCP’s periodic address renewal will interfere with Corosync.
2.1.4. Configure Disk
By default, the installer’s automatic partitioning will use LVM (which allows
us to dynamically change the amount of space allocated to a given partition).
However, it allocates all free space to the / (a.k.a. root) partition,
which cannot be reduced in size later (dynamic increases are fine).
In order to follow the DRBD and GFS2 portions of this guide, we need to reserve space on each machine for a replicated volume.
Enter the INSTALLATION DESTINATION section and select the disk where you want to install the OS. Then under Storage Configuration, select Custom and press Done.
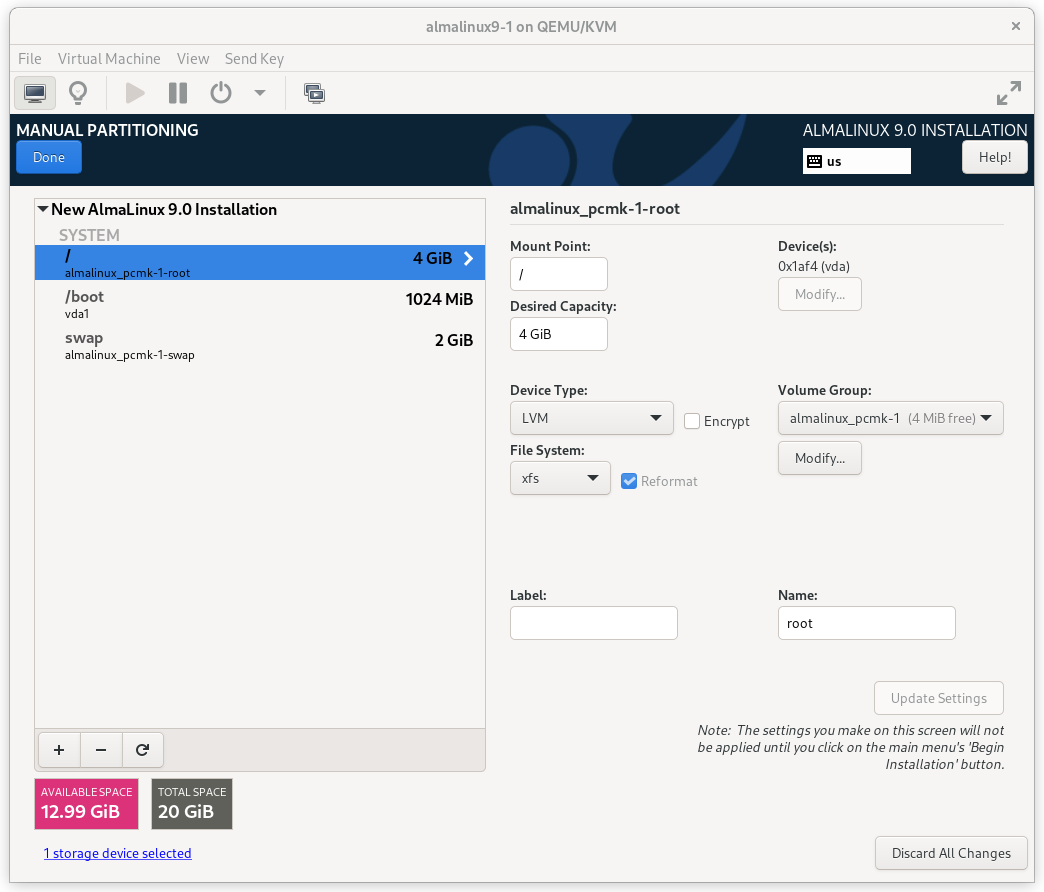
AlmaLinux 9 Installation Destination Screen
On the MANUAL PARTITIONING screen that comes next, click the option to create
mountpoints automatically. Select the / mountpoint and reduce the Desired
Capacity down to 4 GiB or so. (The installer will not allow you to proceed if
the / filesystem is too small to install all required packages.)
AlmaLinux 9 Manual Partitioning Screen
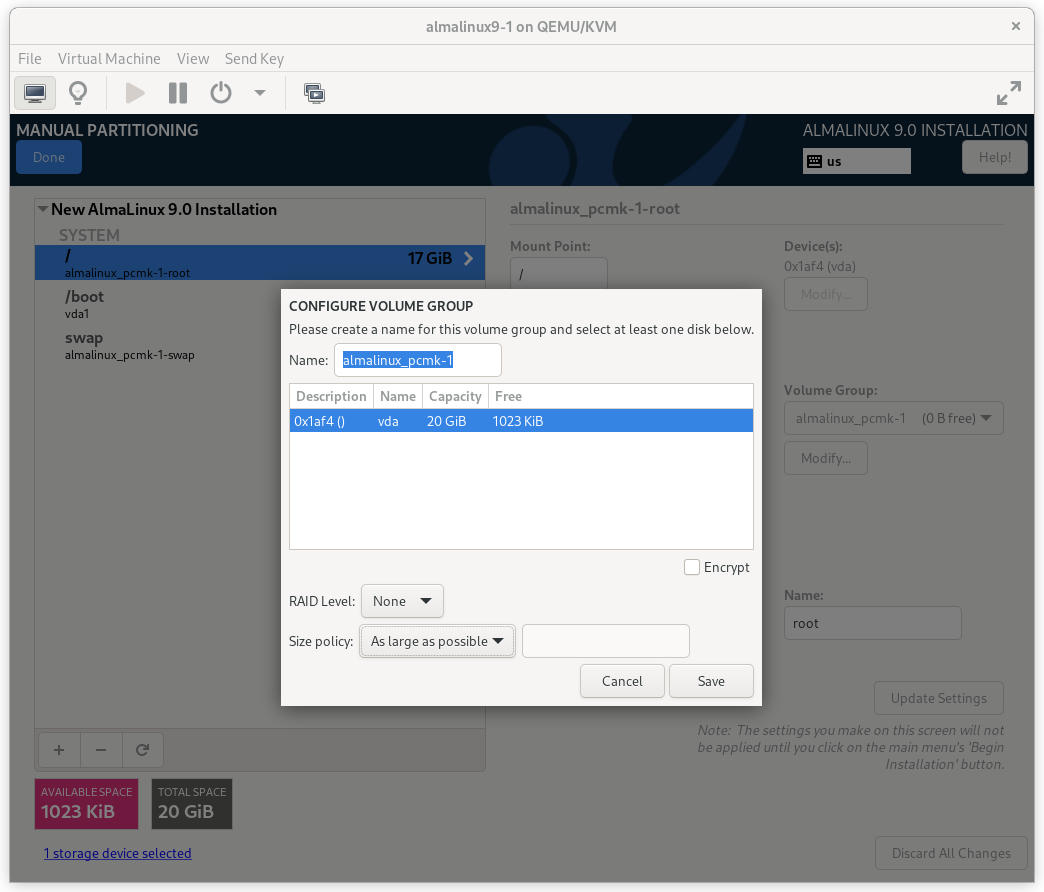
Then select Modify… next to the volume group name. In the CONFIGURE VOLUME GROUP dialog box that appears, change the Size policy to As large as possible, to make the reclaimed space available inside the LVM volume group. We’ll add the additional volume later.
AlmaLinux 9 Configure Volume Group Dialog
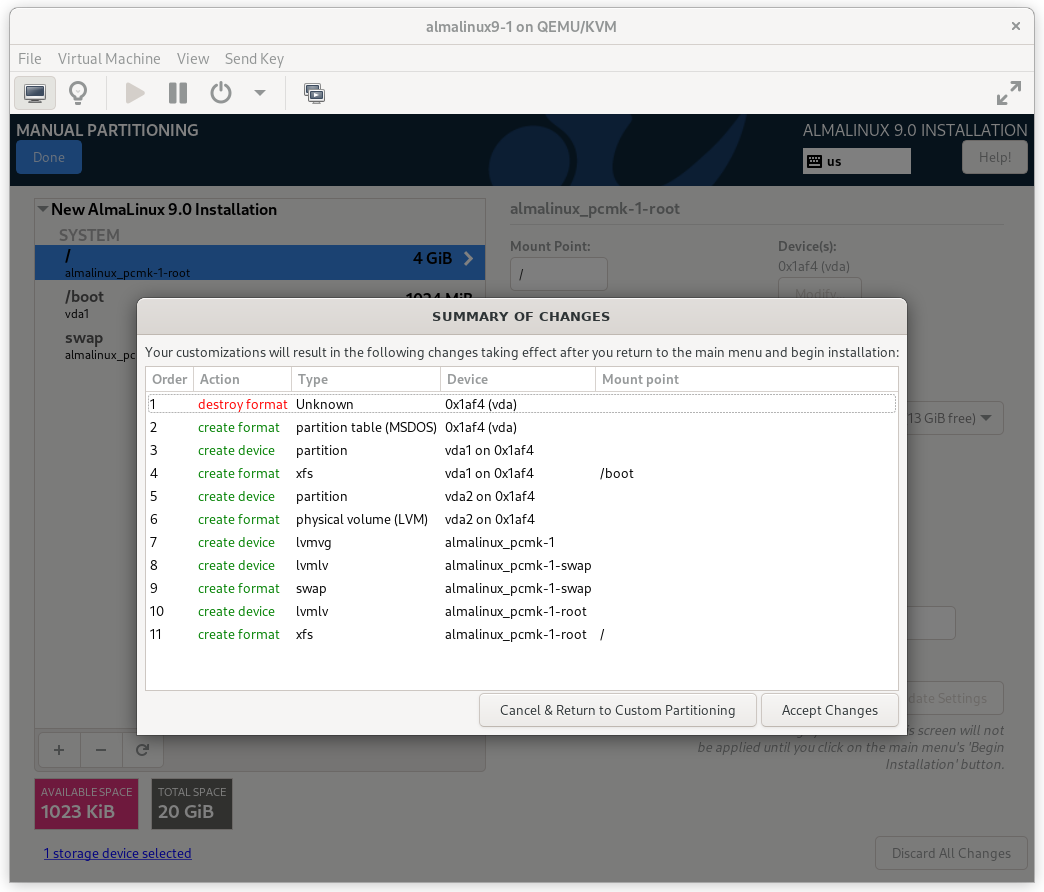
Press Done. Finally, in the SUMMARY OF CHANGES dialog box, press Accept Changes.
AlmaLinux 9 Summary of Changes Dialog
2.1.5. Configure Time Synchronization
It is highly recommended to enable NTP on your cluster nodes. Doing so ensures all nodes agree on the current time and makes reading log files significantly easier.
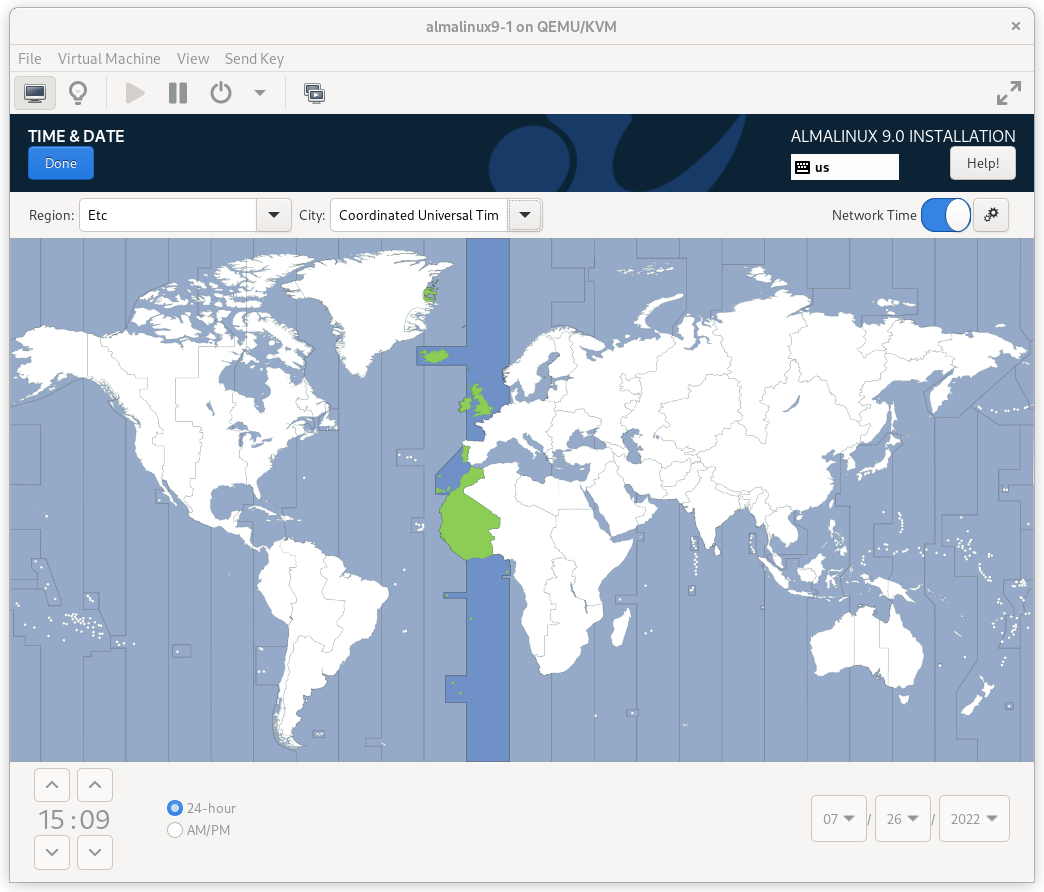
AlmaLinux will enable NTP automatically. If you want to change any time-related settings (such as time zone or NTP server), you can do this in the TIME & DATE section. In this example, we configure the time zone as UTC (Coordinated Universal Time).
AlmaLinux 9 Time & Date Screen
2.1.6. Root Password
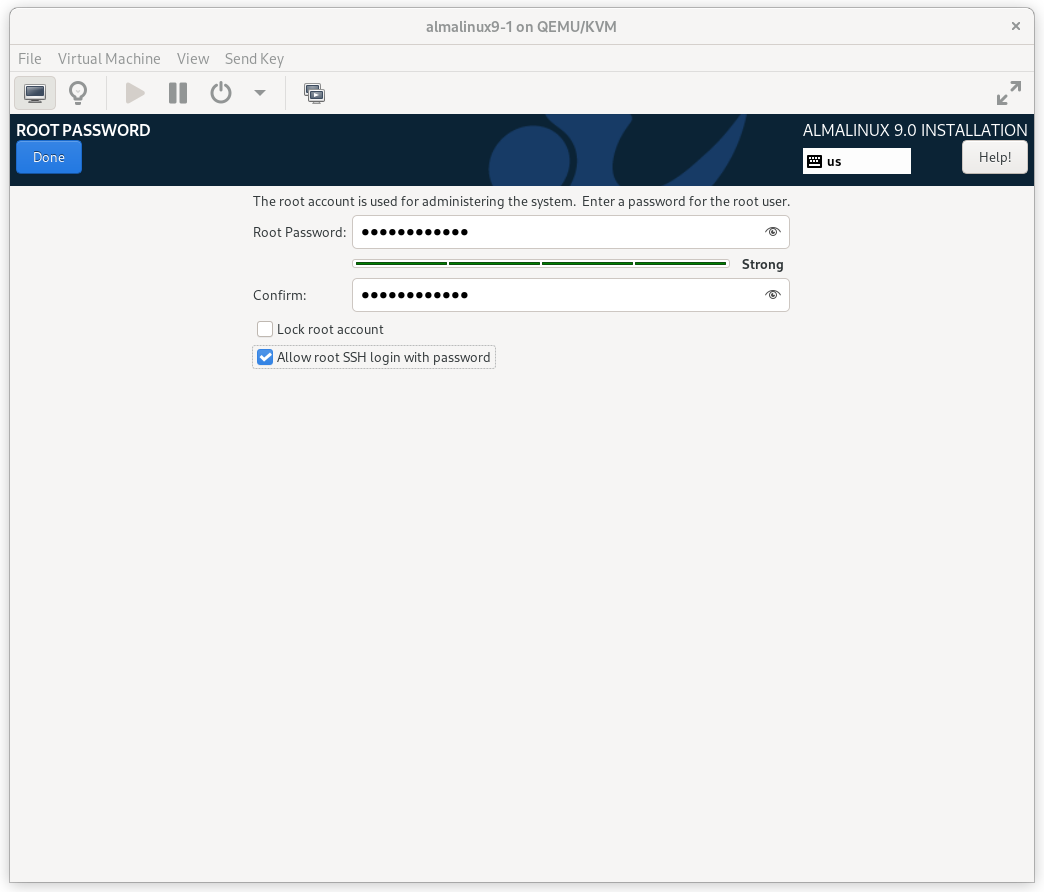
In order to continue to the next step, a Root Password must be set. Be sure to check the box marked Allow root SSH login with password.
AlmaLinux 9 Root Password Screen
Press Done. (Depending on the password you chose, you may need to do so twice.)
2.1.7. Finish Install
Select Begin Installation. Once it completes, Reboot System
as instructed. After the node reboots, you’ll see a login prompt on
the console. Login using root and the password you created earlier.

AlmaLinux 9 Console Prompt
Note
From here on, we’re going to be working exclusively from the terminal.
2.2. Configure the OS
2.2.1. Verify Networking
Ensure that the machine has the static IP address you configured earlier.
[root@pcmk-1 ~]# ip addr
1: lo: <LOOPBACK,UP,LOWER_UP> mtu 65536 qdisc noqueue state UNKNOWN group default qlen 1000
    link/loopback 00:00:00:00:00:00 brd 00:00:00:00:00:00
    inet 127.0.0.1/8 scope host lo
       valid_lft forever preferred_lft forever
    inet6 ::1/128 scope host
       valid_lft forever preferred_lft forever
2: enp1s0: <BROADCAST,MULTICAST,UP,LOWER_UP> mtu 1500 qdisc fq_codel state UP group default qlen 1000
    link/ether 52:54:00:32:cf:a9 brd ff:ff:ff:ff:ff:ff
    inet 192.168.122.101/24 brd 192.168.122.255 scope global noprefixroute enp1s0
       valid_lft forever preferred_lft forever
    inet6 fe80::c3e1:3ba:959:fa96/64 scope link noprefixroute
       valid_lft forever preferred_lft forever
Note
If you ever need to change the node’s IP address from the command line,
follow these instructions, replacing ${conn} with the name of your
network connection. You can find the list of all network connection names
by running nmcli con show; you can get details for each connection by
running nmcli con show ${conn}.
[root@pcmk-1 ~]# nmcli con mod ${conn} ipv4.addresses "${new_address}"
[root@pcmk-1 ~]# nmcli con up ${conn}
Next, ensure that the routes are as expected:
[root@pcmk-1 ~]# ip route
default via 192.168.122.1 dev enp1s0 proto static metric 100
192.168.122.0/24 dev enp1s0 proto kernel scope link src 192.168.122.101 metric 100
If there is no line beginning with default via, then use nmcli to add a
gateway:
[root@pcmk-1 ~]# nmcli con mod ${conn} ipv4.gateway "${new_gateway_addr}"
[root@pcmk-1 ~]# nmcli con up ${conn}
Now, check for connectivity to the outside world. Start small by testing whether we can reach the gateway we configured.
[root@pcmk-1 ~]# ping -c 1 192.168.122.1
PING 192.168.122.1 (192.168.122.1) 56(84) bytes of data.
64 bytes from 192.168.122.1: icmp_seq=1 ttl=64 time=0.492 ms

--- 192.168.122.1 ping statistics ---
1 packets transmitted, 1 received, 0% packet loss, time 0ms
rtt min/avg/max/mdev = 0.492/0.492/0.492/0.000 ms
Now try something external; choose a location you know should be available.
[root@pcmk-1 ~]# ping -c 1 www.clusterlabs.org
PING mx1.clusterlabs.org (95.217.104.78) 56(84) bytes of data.
64 bytes from mx1.clusterlabs.org (95.217.104.78): icmp_seq=1 ttl=54 time=134 ms

--- mx1.clusterlabs.org ping statistics ---
1 packets transmitted, 1 received, 0% packet loss, time 0ms
rtt min/avg/max/mdev = 133.987/133.987/133.987/0.000 ms
2.2.2. Login Remotely
The console isn’t a very friendly place to work from, so we will now switch to accessing the machine remotely via SSH where we can use copy and paste, etc.
From another host, check whether we can see the new host at all:
[gchin@gchin ~]$ ping -c 1 192.168.122.101
PING 192.168.122.101 (192.168.122.101) 56(84) bytes of data.
64 bytes from 192.168.122.101: icmp_seq=1 ttl=64 time=0.344 ms

--- 192.168.122.101 ping statistics ---
1 packets transmitted, 1 received, 0% packet loss, time 0ms
rtt min/avg/max/mdev = 0.344/0.344/0.344/0.000 ms
Next, login as root via SSH.
[gchin@gchin ~]$ ssh root@192.168.122.101
The authenticity of host '192.168.122.101 (192.168.122.101)' can't be established.
ECDSA key fingerprint is SHA256:NBvcRrPDLIt39Rf0Tz4/f2Rd/FA5wUiDOd9bZ9QWWjo.
Are you sure you want to continue connecting (yes/no/[fingerprint])? yes
Warning: Permanently added '192.168.122.101' (ECDSA) to the list of known hosts.
root@192.168.122.101's password:
Last login: Tue Jan 10 20:46:30 2021
[root@pcmk-1 ~]#
2.2.3. Apply Updates
Apply any package updates released since your installation image was created:
[root@pcmk-1 ~]# dnf update -y
2.2.4. Use Short Node Names
During installation, we filled in the machine’s fully qualified domain name (FQDN), which can be rather long when it appears in cluster logs and status output. See for yourself how the machine identifies itself:
[root@pcmk-1 ~]# uname -n
pcmk-1.localdomain
We can use the hostnamectl tool to strip off the domain name:
[root@pcmk-1 ~]# hostnamectl set-hostname $(uname -n | sed s/\\..*//)
Now, check that the machine is using the correct name:
[root@pcmk-1 ~]# uname -n
pcmk-1
You may want to reboot to ensure all updates take effect.
2.3. Repeat for Second Node
Repeat the installation steps so far, so that you have two nodes ready to have the cluster software installed.
For the purposes of this document, the additional node is called
pcmk-2 with address 192.168.122.102.
2.4. Configure Communication Between Nodes
2.4.1. Configure Host Name Resolution
Confirm that you can communicate between the two new nodes:
[root@pcmk-1 ~]# ping -c 3 192.168.122.102
PING 192.168.122.102 (192.168.122.102) 56(84) bytes of data.
64 bytes from 192.168.122.102: icmp_seq=1 ttl=64 time=1.22 ms
64 bytes from 192.168.122.102: icmp_seq=2 ttl=64 time=0.795 ms
64 bytes from 192.168.122.102: icmp_seq=3 ttl=64 time=0.751 ms

--- 192.168.122.102 ping statistics ---
3 packets transmitted, 3 received, 0% packet loss, time 2054ms
rtt min/avg/max/mdev = 0.751/0.923/1.224/0.214 ms
Now we need to make sure we can communicate with the machines by their
name. Add entries for the machines to /etc/hosts on both nodes. You can
add entries for the machines to your DNS server if you have one, but this can
create a single-point-of-failure (SPOF) if the DNS server goes down [1]. If
you add entries to /etc/hosts, they should look something like the
following:
[root@pcmk-1 ~]# grep pcmk /etc/hosts
192.168.122.101 pcmk-1.localdomain  pcmk-1
192.168.122.102 pcmk-2.localdomain  pcmk-2
We can now verify the setup by again using ping:
[root@pcmk-1 ~]# ping -c 3 pcmk-2
PING pcmk-2.localdomain (192.168.122.102) 56(84) bytes of data.
64 bytes from pcmk-2.localdomain (192.168.122.102): icmp_seq=1 ttl=64 time=0.295 ms
64 bytes from pcmk-2.localdomain (192.168.122.102): icmp_seq=2 ttl=64 time=0.616 ms
64 bytes from pcmk-2.localdomain (192.168.122.102): icmp_seq=3 ttl=64 time=0.809 ms

--- pcmk-2.localdomain ping statistics ---
3 packets transmitted, 3 received, 0% packet loss, time 2043ms
rtt min/avg/max/mdev = 0.295/0.573/0.809/0.212 ms
2.4.2. Configure SSH
SSH is a convenient and secure way to copy files and perform commands
remotely. For the purposes of this guide, we will create a key without a
password (using the -N option) so that we can perform remote actions
without being prompted.
Warning
Unprotected SSH keys (those without a password) are not recommended for servers exposed to the outside world. We use them here only to simplify the demo.
Create a new key and allow anyone with that key to log in:
Creating and Activating a New SSH Key
[root@pcmk-1 ~]# ssh-keygen -f ~/.ssh/id_rsa -N ""
Generating public/private rsa key pair.
Your identification has been saved in /root/.ssh/id_rsa
Your public key has been saved in /root/.ssh/id_rsa.pub
The key fingerprint is:
SHA256:h5AFPmXsGU4woOxRLYHW9lnU2wIQVOxpSRrsXbo/AX8 root@pcmk-1
The key's randomart image is:
+---[RSA 3072]----+
|   o+*BX*.       |
| .oo+.+*O o      |
| .+. +=% O o     |
| . .  =o%.o .    |
|  .    .S+..     |
|        ..o E    |
|         . o     |
|          o      |
|           .     |
+----[SHA256]-----+

[root@pcmk-1 ~]# cat ~/.ssh/id_rsa.pub >> ~/.ssh/authorized_keys
Install the key on the other node:
[root@pcmk-1 ~]# ssh-copy-id pcmk-2
/usr/bin/ssh-copy-id: INFO: Source of key(s) to be installed: "/root/.ssh/id_rsa.pub"
The authenticity of host 'pcmk-2 (192.168.122.102)' can't be established.
ED25519 key fingerprint is SHA256:QkJnJ3fmszY7kAuuZ7wxUC5CC+eQThSCF13XYWnZJPo.
This host key is known by the following other names/addresses:
    ~/.ssh/known_hosts:1: 192.168.122.102
Are you sure you want to continue connecting (yes/no/[fingerprint])? yes
/usr/bin/ssh-copy-id: INFO: attempting to log in with the new key(s), to filter out any that are already installed
/usr/bin/ssh-copy-id: INFO: 1 key(s) remain to be installed -- if you are prompted now it is to install the new keys
root@pcmk-2's password:

Number of key(s) added: 1

Now try logging into the machine, with:   "ssh 'pcmk-2'"
and check to make sure that only the key(s) you wanted were added.
Test that you can now run commands remotely, without being prompted:
[root@pcmk-1 ~]# ssh pcmk-2 -- uname -n
pcmk-2
Finally, repeat this same process on the other node. For convenience, you can
also generate an SSH key on your administrative machine and use ssh-copy-id
to copy it to both cluster nodes.
| [1] | You can also avoid this SPOF by specifying an addr option for each
node when creating the cluster. We will discuss this in a later section. |